Monday, August 15, 2011

Ginger-Soy Salmon

Atlantic goodness


Hello everyone!  Hope that you had a wonderful weekend.  Last night my roommate and I went out to eat for her last night in Ohio (she flew to Florida for a week this morning) and we had chicken wings, pizza, and french fries.  And I didn't regret it one bit.  It feels nice to pig out every so often :)  But since I ate out yesterday, I decided that I HAD to cook tonight.  I only cooked one of the three recipes that I proposed last week, so I will be cooking the rest them this week.


I started with the salmon recipe because I have been craving it all week.  I try to eat fish once a week but I had so much lasagna from last week, I didn't eat much else.  This recipe is a conglomeration of at least 3 recipes - Mike's dad makes a great salmon with soy sauce, olive oil, and scallions; my parents make a marinade with soy sauce, limes, and sugar; and I've had dishes that combine soy and ginger at many restaurants. 


I loooove this recipe.  I think that it tastes complex enough to come from a restaurant, but it is still very comforting.  It's not heavy, and if paired with brown rice and a veggie, it's a very balanced meal. It's a home run.


Even though there are a lot of ingredients, it only takes a few minutes to throw the marinade together, and 5 minutes or so to crisp the skin.  The rest of the time is spent on letting the fish marinate and on baking the fish.  I hope you enjoy this as much as I do.. I had a hard time keeping myself from eating two servings (I promise, I saved some for tomorrow).


P.S. You can skip crisping the skin in the frying pan, but I recommend that you try it at least once.  It is well worth the extra 5 minutes.  You'll thank me once you try it.  Promise.


Ginger-Soy Salmon
Serves 4
Print this recipe


Ingredients
4 6-oz pieces of skin-on salmon
1/2 cup soy sauce
2 tablespoons sugar
2 tablespoons olive oil
4 tablespoons water 
6 cloves of garlic
1-inch section ginger
Juice of 1 lime
2 scallions
finely ground black pepper
2 tablespoons olive oil
a few drops of dark sesame oil
cilantro, to garnish
toasted black and white sesame seeds, to garnish


Directions
1. To make the marinade: In a dish large enough to place the salmon in a single layer, combine soy sauce, sugar, olive oil, lime juice, water, and black pepper. Grate in garlic and ginger. Finely slice the scallions and add the whites to the marinade (reserve the greens to garnish). At this point, taste the marinade and adjust seasonings.  Set aside 1/3 cup of marinade for later. 
2. Place salmon into marinade and turn to coat both sides. Marinate for at least 1 hour, flesh side down. 
3. Preheat oven to 375 degrees F.  While the oven is preheating, heat 2 tablespoons of olive oil on high heat in a stainless steel frying pan.  
4. Remove fish from marinade and dry the skin with a paper towel.  When the oil is hot, place the salmon skin side down into the pan.  Press the fish down with a spatula to ensure that the skin has good contact with the pan.  Cook for 3-4 minutes or until the skin becomes crispy.  You'll know when it is ready when the fish easily releases from the pan.  Don't try to pry it off!*
5. Transfer the salmon to a sheet pan with a cooling rack (to elevate the fish and keep the skin crispy).  Bake for 15-20 minutes, or until the thickest portion of the salmon begins to firm up.  Be very careful not to overcook!!
6. While the fish is cooking, discard the oil from the frying pan, and heat the marinade that was set aside earlier.  Simmer until it reduces by a third to a half.  Take it off the heat and add a few drops of sesame oil, if desired.  
7. Top the fish with a small amount of the reduced marinade and garnish with sesame seeds, cilantro, and scallions. Serve with rice. 


*If you do not care for crispy skin, you can just bake for 20-25 minutes. I would still bake it on the cooling rack, just so the skin doesn't get soggy. 


That's all folks. Night!


xoxo <3
Nhu-Y


Sunday, August 14, 2011

Yellow squash lasagna

A healthy twist


Hello friends!  Hope you've been doing well.  The weather is beautiful here in Ohio!  It was in the 50s this morning when I woke up and will be in the 70s today.  It's a dream.  I love the summer (I am Vietnamese after all) but this heat and humidity is really getting to be too much.  I can't walk from my car to the hospital without breaking a sweat.  I can't wait until autumn is here.  I have lots of fun scarves and boots that I have just been aching to break out!


Now I know that in my last post, I promised that I would cook more, but I haven't gotten to all of the recipes yet :/ But it's not because I've been eating junk, it's because I grossly underestimated how much lasagna my recipe would make!  I have a huge 9x13 pan which isn't even half gone.  I may freeze the rest of it so I can start eating something else :)


I came up with this recipe because I love pasta.. a little too much.  I grew up eating rice with every meal (yes, even with breakfast sometimes) so naturally I love carbohydrates.  Bread, pasta, rice - I'll even eat it plain and be happy.  However, now that I'm getting older I don't think that my body appreciates all that starch.  I even get sleepy after I eat a bowl of pasta nowadays!  I didn't completely eliminate the lasagna noodles because it would be too sad to make lasagna without any pasta (could it still be called lasagna?) so I just substituted half of the noodles with thin slices of quick roasted yellow squash.  I just used my mandoline to cut 1/4"-1/8" slices, but you can easily use a sharp knife as well.


I especially like this recipe because it tastes like a traditional lasagna, even though it is a healthier version.  I use reduced fat cheeses, ground turkey, and the squash in both the sauce and as a substitute for noodles, but it's still mighty good.  I think I've seen healthy lasagna recipes with eggplant "noodles" instead of yellow squash, but I think that the eggplant gets kind of mushy.  The squash maintains its texture and has a very mild flavor - a great substitute for an al dente lasagna noodle.  If you can't find yellow squash, you can use zucchini instead - or if you don't want to be healthy, just use all noodles, full-fat cheese, and beef and have a regular lasagna (I'm not judging)


The recipe takes a little bit of time to make, but you can do some of the steps simultaneously.  Also, the time spent cooking is worth it because you'll be eating for days!  I recommend you halve or even quarter the recipe if you are cooking for just one or two people. Alright, enjoy!


Yellow Squash Lasagna
Serves 8
Print this recipe


Ingredients
6 lasagna noodles
3 medium yellow squash
2 teaspoons olive oil
2 cups reduced fat shredded mozzarella cheese 
15 ounces of low-fat ricotta cheese (one standard container)
1 egg
1/8 cup grated parmesan cheese
2 tablespoons flat leaf parsley, finely chopped
1/2 teaspoon kosher salt
freshly ground black pepper
double recipe of meat sauce


Directions
1. Preheat oven to 375 degrees and boil a large pot of water.
2. Peel the squash.  Small dice one of them, and thinly slice the other two on the long axis (to make long slices, not discs).  Make the slices a little thicker than a lasagna noodle.
3. Take the slices of squash and drizzle them with olive oil.  Roast in oven for approximately 5 minutes.  Don't let the squash cook for too long, or they will become mushy.
4. While waiting for the water to boil, begin making the meat sauce, sautéing the diced squash with the garlic and onions.
5. By this point, the water should be boiling - cook the lasagna noodles according to the directions.
6. While the noodles are cooking, combine the ricotta, parmesan, 1/4 cup mozzarella, egg, parsley, salt, and pepper.  Set aside. 
7.  When the squash, lasagna noodles, and meat sauce are done, build the lasagna.  Start by ladling a small amount of sauce on the bottom of a 9"x13"baking dish so the noodles do not stick.  Lay 3 lasagna noodles on top of the sauce.  Now take a quarter of the ricotta mixture and spread it on top of the noodles.  Ladle a layer of sauce on top of the ricotta layer.  Take a quarter of the remaining shredded mozzarella and sprinkle on the sauce layer.  Place one thin layer of sliced squash on the cheese. Then ricotta, sauce, mozzarella again.  Now repeat these two layers again so you have 4 layers total. End with shredded mozzarella.  You should be left with about half of the meat sauce.
8. Bake for 30 minutes, or until cheese is hot and bubbly.  Slice and top with the remaining sauce.


I hope that these instructions made some sense.  I tried to write it so you can be efficient and do some steps simultaneously. I have realized how difficult it is to write recipes!  I really like to cook my own recipes, but I normally just throw things together and taste as I go.  Cooking is so much more difficult when you have to keep track of quantities!  


Again, somehow this post became super long, so I will let you go for now.  Have a wonderful weekend, everyone!  


xoxo <3
Nhu-Y


Tuesday, August 9, 2011

Roasted Broccoli & Garlic Green Beans

Eat your veggies!


'Ello mates! (I've been watching a TV show with a hot Australian guy).  So sorry I have been a bad blogger lately.  Still feeling a little down in the dumps.. had to take the day off yesterday.  I'm feeling much better today though! 


So...... I didn't really cook at all last week :/  Monday and Tuesday I ate with friends, Wednesday I skipped dinner, Thursday I made some egg fried rice with some old rice, and Friday I skipped dinner again.  Well, really I didn't skip dinner on Wednesday and Friday.  I just ate chips, hummus, and fruit when I came home from work and didn't eat for the rest of the night.  Then Saturday I ordered a pizza and ate it for lunch and dinner on Saturday and Sunday.  Disgusting. I'm pretty sure that the way I'm eating is contributing to how I feel.  


Anyways, I am going to plan my meals this week so I have some balanced meals.  I wouldn't normally plan on my blog, but I will this week so I am accountable!  Ok, here goes:


Tuesday - Zucchini lasagna
Thursday - Fish tacos
Saturday - Ginger-soy salmon


Hmm, that wasn't as hard as I thought it would be.  


Ok, now on to the recipes!  Since I haven't posted for a week, I'll do 2 recipes today.  Both veggies.  I'm sort of a dunce when it comes to cooking vegetables.  I usually just steam them with salt and pepper, or roast them with salt and pepper. It's really boring, but I enjoy the taste of vegetables so I don't add a lot of other flavors.  


First, let's talk about roasted broccoli.  It may sound boring, but it is definitely worth trying.  Roasting sort of concentrates the broccoli flavor (or maybe steaming diffuses the flavor, I'm not sure) and brings a nutty component .  And, it's just as easy as steaming!  Next, garlic green beans.  Actually not much to say about them.  Not very complicated but makes the green beans much better than salt and pepper.  Ok, I think I'm running out of things to say, so here are the recipes!


Roasted broccoli
Serves 4
Print this recipe


Ingredients
4 heads of broccoli
2 tablespoons olive oil
Kosher salt and freshly ground black pepper


Directions
1. Preheat oven to 425 degrees F.
2. Cut broccoli into florets, discarding (or saving) the stalks.
3. Toss with olive oil, salt, and pepper.
4. Place on a baking sheet and roast for approximately 20 minutes, or until the edges of the florets just turn brown.
5. Serve immediately.


Garlic green beans
Serves 4
Print this recipe


Ingredients
1 pound of green beans, ends trimmed
2-3 cloves of garlic, minced
2 tablespoons olive oil
Kosher salt and freshly ground black pepper


Directions
1. Boil a large pot of water.  Add the beans and blanch for about 5 minutes. 
2. Transfer the beans to an ice bath and drain.*
3. While the beans are blanching, begin cooking the garlic in the olive oil on medium heat.  Start the garlic in a cold pan to bring out the flavor of the garlic and to prevent burning of the garlic. Cook for approximately 5 minutes, or until the garlic is fragrant but not brown.
4. Add the green beans to the pan, season with salt and pepper, and cook for an additional 5 minutes. 


*You don't necessarily have to do the ice bath, but it keeps the beans nice and green.  Just reduce the cooking time by a few minutes so you don't overcook them.


Ok, that's it for now, I need to get back to studying :)  As per usual, this post ended up much longer than I anticipated it to be. I promise, I'll be back this week with some better recipes!


xoxo <3
Nhu-Y


Thursday, August 4, 2011

Parmesan-herb crusted chicken

Deliciously resourceful


Sorry I haven't been around for a while!  I've finished my research rotation and now I am on a "real" rotation - Radiology.  Last month I didn't have to go in until 9:00 and I left around 2:30 (it was great).  Radiology actually has pretty good hours, but I do have to wake up around 6:00 so I can get in by 7:45 and my sleep schedule is alllll messed up from last month.  I haven't been asleep before midnight all week, so I am pretty tired.  It doesn't make it any better that my rotation calls for sitting in a dark room for hours at a time.  Radiologists are some of the smartest doctors I've met, but boy, this rotation is soooooooo boring!  It feels like time stops when I am at work. It's sorta miserable. 

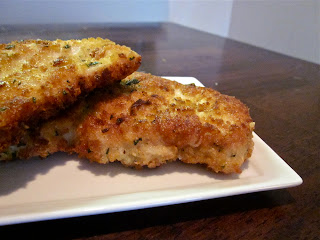
Anyways, I haven't been cooking much this week just because I feel sort of crappy, but I do have this recipe saved up.  I cooked this for Mike last Friday before he left for Indianapolis.  I wanted to cook one of my staples, lemon-herb chicken (which will be posted in the near future!).  But... we didn't have any lemon and it would have been ridiculous for me to run to the grocery store for just one lemon.  So I looked around the kitchen and I saw that I had a block of Parmigiano Reggiano and half of a stale baguette leftover from Bruschetta, which lead me to this recipe!  I was actually looking for breadcrumbs, but Mikey didn't have any so I made them from the baguette - and it was the best idea ever.  It made the chicken so crispy.  Sometimes I think that packaged breadcrumbs can be kind of dense and they can absorb more oil than I would like.  Quick story - over our 3 years together, I have slowly transformed his kitchen from a typical man kitchen (beer, mismatched plates, and a Foreman grill) to a somewhat usable kitchen by bringing a chef's knife and lots of utensils and tools, but I haven't come around to bringing a blender or a food processor. So I was a little ghetto when I made the breadcrumbs because I had to pound them with a meat mallet! You gotta do what you gotta do when you're hungry :)


In addition to making fresh breadcrumbs, I like to grate my own cheese with a Microplane.  The Microplane is one of my favorite kitchen instruments! You should pick one up if you love to cook. It makes a wonderful fluffy cloud of cheese that will keep the coating light.


This recipe is pretty versatile. You could probably use panko breadcrumbs. Or mix up the herbs (I used thyme).  Or even use some other kind of cheese.  I'm all about adjusting recipes depending on what's around the house - we Vietnamese are resourceful!   Anyways, I hope you all enjoy the recipe. 


P.S. This isn't the most healthy recipe (it's pan fried in olive oil) since I wanted to treat Mikey before he left, but you can easily cut down on the fat by baking the chicken.  I guess I would cook at 350-375 degrees for 10-15 minutes, or until the chicken is no longer pink when cut. 


Parmesan-herb crusted chicken
Serves 4

Ingredients
1/4 cup flour
2 eggs
1 tablespoon fresh thyme, finely chopped
1 tablespoon fresh rosemary, finely chopped
1 cup fresh breadcrumbs*
2 tablespoons garlic, minced
1 cup grated Parmigiano Reggiano cheese
4 skinless, boneless chicken breast halves, pounded 1/4-inch thick
4 tablespoons olive oil
Salt and freshly ground black pepper

Directions:
 1. Season chicken cutlets with salt and freshly ground black pepper.  Use about half of the salt that you would usually use, since you will be coating with Parmigiano Reggiano later.
 2. Gather 3 shallow dishes.  In the first dish, place the flour.  In the second dish, beat 2 eggs. In the third dish, combine the thyme, rosemary, breadcrumbs, garlic, and cheese.
 3. Heat 2 tablespoons of olive oil on medium-high heat.  While oil is heating up, coat chicken - first in flour, then in egg, finally in breadcrumb-herb-cheese mixture.  Between each step, make sure you shake the cutlets off so they are not over-coated.
 4. Cook the cutlets, two at a time, for about 3-4 minutes per side (or until golden brown).  Repeat with the remaining olive oil and cutlets. 

*Fresh breadcrumbs can be replaced by dried breadcrumbs, but they can be dense. Here's an easy way to make fresh breadcrumbs that only takes 10 minutes!  Take about a quarter of a day old baguette and slice into very thin (1/4 inch or less if you can) slices.  Place in a 250 degree oven for 10 minutes, or until the slices are crisp all the way though. Try not to brown them too much. The thinner you slice the baguette, the faster it will crisp.  Cool for a minute or so and then pulse in a food processor.  Voila! Fresh breadcrumbs :)


Here's the entire meal we had that night. I'll post the rest of the recipes soon.  Sorry the pictures aren't great but we were hungry and it smelled so good so I took the pictures in a hurry.   Goodbye for now, loves!

xoxo <3
Nhu-Y

Monday, August 1, 2011

Lemon-pepper tilapia

You'll never use the powdered stuff again!


Photo courtesy of Jenny's camera phone
This post is dedicated to my dear cousin and wonderful roommate, Jenny Luu.  We haven't spent any time with each other for a while, so today we shopped for 5 hours!  It's amazing how much damage we can do at the mall :). We (sort of) behaved ourselves today though. I got a pair of boots for the fall, a shirt (for $7!), and an obi belt that I have been eyeing for months :) After such a shopping trip, we didn't want to spend any more money on eating out, so we decided that we would cook a cheap and healthy meal for dinner.  We were also having some girls over, and really, we didn't want to pay for restaurant food either!  Plus, since Jenny is moving out in a month, I have to teach her some recipes so she doesn't starve when I'm not around (Love you Jenny!)


Since we wanted something healthy and cheap, we chose tilapia.  Salt and pepper was easy but boring, and we are not boring girls!  Actually, we had lemon-pepper tilapia once before - Jenny made me lemon pepper fish once with some powdered lemon pepper ... and it was the most horrible thing I had ever tasted!  It tasted like chemicals - like a combination of the stuff they put on sour patch kids to make them sour plus cheap black pepper - ick.  So I came up with this recipe for her because it is super easy and it only takes 20 minutes to make.  The lemon zest gives the fish lots of great lemon flavor without being tart.  Jenny, I hope you took notes!


Lemon pepper tilapia
Serves 4
Print this recipe


Ingredients
4 tilapia fillets
1 lemon, zested and thinly sliced
1 teaspoon fresh thyme, finely chopped
1 large or 2 small cloves of garlic, minced
2 teaspoons extra virgin olive oil
salt and freshly ground black pepper


Directions
1. Preheat oven to 375 degrees F. 
2. Combine lemon zest, thyme, and garlic in a small bowl.
3. Season both sides of tilapia with salt and pepper.
4. Lay lemon slices in a single layer on a piece of parchment paper (on a baking sheet), then lay the tilapia fillets on top of the lemon slices. 
5. Top each fillet with the zest-garlic-thyme mixture and rub it in. 
6. Drizzle with olive oil.
7. Bake for 15 minutes or until fish is opaque and flakey. 
8. Enjoy without guilt! 


Crap, it's past 11:00 and I told myself that I would be in bed by 10:00 for work tomorrow.  Please excuse any spelling errors, I wrote this super fast as I was chatting with the ladies!


xoxo <3
Nhu-Y

Sunday, July 31, 2011

Betty's


Hope everyone is having a happy Sunday, because I sure ain't.  Still feeling sick from a few days ago, and now I feel like vomiting my brains out  >_<.  I finally came back to my apartment and I had some grand plans to clean, do laundry, cook, etc, but all I did today was cuddle on the couch with my pup.  Mike left for Indianapolis today and I'm sadder than I thought I would be :(  Gotta be strong though. We're only going to be apart for a few months though, I can handle it!  Hopefully I will have more time to hang out with my roomie; we haven't been at our apartment together for more than 2 days at a time for quite some time!  

Ok, enough ranting, let's talk food!


Last night, Mikey and I went to the Short North district for a date night.  I looove the Short North - it's a little gem within Columbus, with art galleries, vintage shopping, and lots of great non-chain restaurants.  We did a little shopping before we ate to build up our appetites and I found a cute vintage yellow purse for only $19!  The strap is a little short, but for less than 20 bucks, I couldn't pass it up.


Oops, still haven't mentioned the food yet!  So I know in my last post, I said that we were going to try something new, but we ended up going to one of our favorites, Betty's.  It's a really tiny restaurant with no more than 15 tables smooshed into a long and narrow space and you usually have to wait for 40 minutes, but definitely worth it.  Betty's is super kitschy with pin-up girls covering the walls and crazy ceramic cats on the bar - by no means a "sophisticated" place - but it's really fun.  


For our drinks, Mike ordered a beer called Abita Purple Haze.  It was a wheat beer that had raspberry puree added after filtration.  Mike didn't like it much and said that it tasted watery.  I ordered the Mini Van - rose wine, sugar saturated raspberries, and soda.  Sweet and I could barely taste the alcohol, I loved it! (I'm a light-weight - it's an Asian thing.)


We ordered fried plantains served with a zesty yogurt sauce for an appetizer.  When it came out, I was less than impressed with the plating.  There were 5 or 6 pieces of plantains on a giant plate.  I thought that they would be immature and taste like potatoes, but they were nice and sweet like bananas. They weren't too greasy and tasted pretty good.  But I don't think I will be ordering it again because it was $8 for a teeny portion.


For our entrees, we ordered mac and cheese and meatloaf.  Both were wonderful.  We already knew that the mac and cheese was good (it was the reason we went to Betty's in the first place).  Their mac and cheese isn't the run of the mill mac and cheese! It has poblano peppers, sweet corn, and red onions.  OMG, so good.  And the cheese! The cheese is sooo creamy.  They must use evaporated milk or some sort of processed cheese, but I don't even care :).  The meatloaf was a recommendation from one of the docs that I worked with last year.  It was a good choice - Thanks Dr. Wexler!  Very moist and a hint of sweet from the bell peppers and it was even better with the ketchup sauce. Not much else to say about that, I mean how many words do you need to describe meatloaf?


Overall, we love Betty's.  It's not fancy, but it's good food and a fun environment.  Plus, there's a Jeni's like 2 blocks away.  No pictures of that unfortunately.. we started eating before we even paid!  But here's a picture of a crazy ass ride that we took while we were waiting in line for Jeni's - it's called the Cycle Tavern.  A pedal-powered bar-hopping tour.  I really can't describe it because I've never seen anything like it before, so take a look at their website


Whoa, this post is way longer than I thought it would be.  I'm starting my radiology rotation tomorrow, so I'll be back in a few days.  Talk to you then!


xoxo <3
Nhu-Y

Saturday, July 30, 2011

One more day..

Mikey's staying one more day!  He won't leave for Indianapolis until tomorrow... so no food post today :) I've gotta spend some QT with my sunshine. We are going to the Short North district for some quirky eats and some vintage shopping.  I'm so excited!  We're trying a new place tonight, so I may write a "review" on our meal later.


Until next time!


xoxo <3
Nhu-Y