Sunday, July 31, 2011

Betty's


Hope everyone is having a happy Sunday, because I sure ain't.  Still feeling sick from a few days ago, and now I feel like vomiting my brains out  >_<.  I finally came back to my apartment and I had some grand plans to clean, do laundry, cook, etc, but all I did today was cuddle on the couch with my pup.  Mike left for Indianapolis today and I'm sadder than I thought I would be :(  Gotta be strong though. We're only going to be apart for a few months though, I can handle it!  Hopefully I will have more time to hang out with my roomie; we haven't been at our apartment together for more than 2 days at a time for quite some time!  

Ok, enough ranting, let's talk food!


Last night, Mikey and I went to the Short North district for a date night.  I looove the Short North - it's a little gem within Columbus, with art galleries, vintage shopping, and lots of great non-chain restaurants.  We did a little shopping before we ate to build up our appetites and I found a cute vintage yellow purse for only $19!  The strap is a little short, but for less than 20 bucks, I couldn't pass it up.


Oops, still haven't mentioned the food yet!  So I know in my last post, I said that we were going to try something new, but we ended up going to one of our favorites, Betty's.  It's a really tiny restaurant with no more than 15 tables smooshed into a long and narrow space and you usually have to wait for 40 minutes, but definitely worth it.  Betty's is super kitschy with pin-up girls covering the walls and crazy ceramic cats on the bar - by no means a "sophisticated" place - but it's really fun.  


For our drinks, Mike ordered a beer called Abita Purple Haze.  It was a wheat beer that had raspberry puree added after filtration.  Mike didn't like it much and said that it tasted watery.  I ordered the Mini Van - rose wine, sugar saturated raspberries, and soda.  Sweet and I could barely taste the alcohol, I loved it! (I'm a light-weight - it's an Asian thing.)


We ordered fried plantains served with a zesty yogurt sauce for an appetizer.  When it came out, I was less than impressed with the plating.  There were 5 or 6 pieces of plantains on a giant plate.  I thought that they would be immature and taste like potatoes, but they were nice and sweet like bananas. They weren't too greasy and tasted pretty good.  But I don't think I will be ordering it again because it was $8 for a teeny portion.


For our entrees, we ordered mac and cheese and meatloaf.  Both were wonderful.  We already knew that the mac and cheese was good (it was the reason we went to Betty's in the first place).  Their mac and cheese isn't the run of the mill mac and cheese! It has poblano peppers, sweet corn, and red onions.  OMG, so good.  And the cheese! The cheese is sooo creamy.  They must use evaporated milk or some sort of processed cheese, but I don't even care :).  The meatloaf was a recommendation from one of the docs that I worked with last year.  It was a good choice - Thanks Dr. Wexler!  Very moist and a hint of sweet from the bell peppers and it was even better with the ketchup sauce. Not much else to say about that, I mean how many words do you need to describe meatloaf?


Overall, we love Betty's.  It's not fancy, but it's good food and a fun environment.  Plus, there's a Jeni's like 2 blocks away.  No pictures of that unfortunately.. we started eating before we even paid!  But here's a picture of a crazy ass ride that we took while we were waiting in line for Jeni's - it's called the Cycle Tavern.  A pedal-powered bar-hopping tour.  I really can't describe it because I've never seen anything like it before, so take a look at their website


Whoa, this post is way longer than I thought it would be.  I'm starting my radiology rotation tomorrow, so I'll be back in a few days.  Talk to you then!


xoxo <3
Nhu-Y

Saturday, July 30, 2011

One more day..

Mikey's staying one more day!  He won't leave for Indianapolis until tomorrow... so no food post today :) I've gotta spend some QT with my sunshine. We are going to the Short North district for some quirky eats and some vintage shopping.  I'm so excited!  We're trying a new place tonight, so I may write a "review" on our meal later.


Until next time!


xoxo <3
Nhu-Y

Friday, July 29, 2011

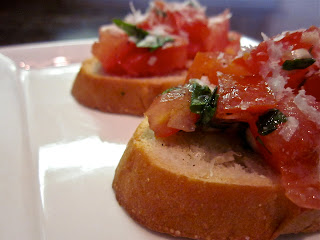
Bruschetta


Leftover tomatoes and basil? No problem!


 TGIF. I've been feeling pretty blah for the past couple of days, but it feels nice to relax now. I had to leave work early today because I was feeling so nauseous :/ I think I have a serious case of GERD. I have been having a dry cough for a few months and I just feel queasy. Guess that doesn't mean much unless you're a med school geek like me, but believe me, it's no fun. 


I left work around 2:30 and I was hoping that I would feel a little better after the drive home so I could get some stuff done.  But.. still feeling poopy. I really wanted to go to the mall and get these super cute riding boots that I can wear this fall, and I was going to stop off at the grocery store to buy some food to cook for Mikey tonight.  It's gonna be our last meal together for a while!  He's going to Indianapolis (about 3 hours away) for a urology rotation and he's leaving tomorrow.  I'm really sad because he and I are basically inseparable.  I stay at his place for weeks, sometimes months at a time and now we won't really see each other for 3 months (he's going to Chicago after Indianapolis and then I'm going to Dayton for a rotation).  Boo. Guess it's just a taste of what residency will be like. Gotta prepare myself! 


Anyways, since this is a food blog, let's talk about something yummy!


A few days ago I made a caprese salad so I have a bunch of basil and a few vine-ripened tomatoes leftover.  Not wanting any of it to go to waste, I decided to make one of my favorite appetizers - tomato and basil bruschetta. Bru-SKetta, or bru-SHetta, however you pronounce it, is actually the bread - the word bruschetta is derived from the word "bruscare", which means to roast over coals. We Americans have butchered both the pronunciation and the actual definition of the word! Anyhow, I'm just going to call my recipe tomato and basil bruschetta because I am American I don't really know what else to call it.  


As with the caprese salad, I prefer my tomato and basil bruschetta topping to consist of nice, fresh ingredients.  No canned tomatoes, no dried basil, and no jarred garlic.  Please.  I kind of threw this recipe together with the ingredients that I had on hand, so feel free to modify to your liking.  This recipe is a little heavy on the garlic, just to warn you.  I have also done this recipe with a couple of teaspoons of balsamic vinegar stirred in and it is equally as delicious.  You can also top your bruschetta with a little fresh mozzarella cheese and have a little caprese salad on toast!  Well I hope you enjoy this recipe.  It takes about 10 minutes to make, and most of that time is spent chopping. 


Oh by the way, the Kroger by Mike's apartment had chunks of Parmigiano Reggiano on sale for $3/lb! Not the "parmesan" cheese from Wisconsin or whatever, but the actual stuff from Italy (it was stamped on the rind). No offense to Wisconsin cheese - I loooove cheese and will eat almost any kind of cheese from Wisconsin any day, but I think that real Parmigiano Reggiano just has a unique flavor that cannot be replicated.  I think it was so cheap because they were corner pieces with a lot of rind, but you can just use the rind in a soup or stock.  Or you can give it to your dog! Just kidding, don't give it to your dog - he might choke and I couldn't live with that. I think that my dog would just poop it out whole.  Haha, well enjoy the recipe!


Bruschetta (adapted from foodnetwork.com)
Print this recipe

Ingredients
1 narrow Italian or French loaf of bread
1 head garlic, cut in 1/2 crosswise
2 tablespoons extra-virgin olive oil
Kosher salt and pepper
¼ freshly grated Parmesan cheese

Directions
1. Preheat oven on broiler setting. Place a rack approximately 6 inches from broiler.
2. Slice the loaf of bread, on the bias, into 3/4-inch slices. Place bread in oven on sheet pan and broil, approximately 1 minute on each side.
3. Remove to a platter and rub each slice of bread with the garlic and then brush with olive oil. Sprinkle with freshly grated Parmesan cheese and return to oven for 1 minute, or until cheese is melted. (watch carefully so it doesn't burn!)
4. Sprinkle with salt and pepper and serve immediately.


Tomato and Basil Bruschetta
Print this recipe

Ingredients

3 firm vine-ripened tomatoes, diced (about 2 cups)
1 1/2 tablespoons garlic, minced
2 tablespoons fresh basil, finely chopped
1 - 2 tablespoons olive oil
salt and freshly ground black pepper
Parmesan cheese, grated 

Directions
1. In a medium sized bowl, combine tomatoes, garlic, basil, and olive oil. Add salt and freshly ground black pepper to taste.  Allow to sit for 10 minutes for flavors to marry.  Top with freshly grated Parmesan cheese if desired. 


I don't know if I'll be back to post for a few days. I am helping Mikey move tomorrow and then going back to my apartment to clean, clean, clean!  It is a crazy mess at my apartment because I have only been back to drop off dirty clothes and pick up clean ones this past month. Oh well. Have a great weekend, everyone!


xoxo <3
Nhu-Y 


Wednesday, July 27, 2011

Caprese salad

Simple summer salad


 A lot of the women that I have worked with this month have gardens.  Every day at lunch, they bring cucumbers, tomatoes, bell peppers, and other beautiful and colorful vegetables.  Yesterday, one of the ladies was mentioned her basil and tomatoes, so of course caprese salad came to mind.  I thought that it would be a wonderful and light salad, and it was!

Caprese salad is a simple salad from the Italian region of Campania.  It is classically made of fresh sliced mozzarella cheese, tomatoes, and basil seasoned with salt, pepper and olive oil. I’ve seen variations with balsamic vinegar, with marinated cheese, with roasted tomatoes, and even on a stick! But I think the best way to have it is the classic way – it’s the way that the Italians do it, and they know best. 


Because this is such a simple recipe with few ingredients, it is important to get the best ingredients that you can.  I read a review for this recipe and the lady used jack cheese and canned tomatoes – what a crime! (AND she had the nerve to give the recipe 3 stars!)  A farmers market is perfect for this, but even if you don’t have time to go to the farmers market, just make sure you get fresh heirloom or vine-ripened tomatoes, fresh (NOT dried) basil, and fresh mozzarella.  Most supermarkets now have a great cheese selection and some even have antipasti bars where you can get fresh mozzarella. A nice sweet extra-virgin olive oil is good too, but not absolutely necessary.  I have found that Trader Joe’s has a great inexpensive olive oil from California.  I can’t recall the exact name of the oil, but it comes in a tall, dark, cylindrical bottle. 

I just threw this together and didn’t really use a recipe, but I found a Rachael Ray recipe that is similar to what I did.  One thing that I like to do a little differently is season the tomatoes before I layer the salad.  The salt makes the tomatoes a little more tomato-y, if that makes any sense :). Also, I actually like to tear the basil because it makes it easier to eat. I left them whole in the pictures because it was so pretty. I hope you enjoy!

Caprese Salad (courtesy of Rachael Ray)
Serves 4
Print this recipe


Ingredients
3 vine-ripe tomatoes, 1/4-inch thick slices
1 pound fresh mozzarella, 1/4-inch thick slices
20 to 30 leaves (about 1 bunch) fresh basil
Extra-virgin olive oil, for drizzling
Coarse salt and pepper

Directions
Layer alternating slices of tomatoes and mozzarella, adding a basil leaf between each, on a large, shallow platter. Drizzle the salad with extra-virgin olive oil and season with salt and pepper, to taste.

Bon appetit!


Tuesday, July 26, 2011

Roasted Garlic Risotto


Simple Luxury


A few days ago, I wrote a post about roasted garlic and the many different ways you can use it.  Today, I will prove it and use roasted garlic in a recipe! 

When I think of risotto, I think that it belongs with a very fancy meal that takes all day to make.  But the truth is, risotto is very easy to make.  It is a bit time intensive, but as long as you are able to stir, you can make risotto :).   The secret is continuously stirring the risotto as you add the liquid.  It helps the starch come out of the rice, making it very, very creamy with no fattening heavy cream at all!  This particular recipe uses water as the liquid, but traditional risottos use a beef or chicken broth.  Since water is essentially flavoring the rice from the inside, I would use filtered water.  I have also made this recipe with ¾ water and ¼ chicken stock, and it did not overwhelm the garlic.

If you start roasting the garlic first, and then prepare the risotto while the garlic is roasting, it only takes about 40 minutes to make the entire recipe since the garlic is stirred in at the last minute.  I don’t even puree the garlic – I just mash it up with a fork and it saves a few minutes (and a few dirty dishes). This is a great recipe because once you learn the technique you can make any kind of risotto you’d like!

Roasted Garlic Risotto (Adapted from the Bon Appetit Cookbook)
4-6 servings

Ingredients
1-2 heads of garlic, roasted & pureed (depending on how much you like roasted garlic!)
4 cups of water (do not use stock, it will overwhelm the taste of the garlic)
2 tablespoons butter
1/4 cup finely chopped onion
1 cup arborio rice
1/2 cup dry white wine
1/4 cup freshly grated Parmesan cheese
2 tablespoons chopped fresh parsley
salt & freshly ground black pepper

Directions
1. Bring 4 cups water to a simmer in a medium saucepan. Reduce heat to low, cover, and keep hot.
2. Melt butter in heavy large saucepan over medium-high heat. Add onion and saute until tender, about 3 minutes.
3. Add rice and stir until golden, about 3 minutes (toasting the rice helps prevent it from becoming soggy).
4. Add wine and stir until absorbed, about 2 minutes. Ladle in 1/2 cup hot water (or as much as your ladle will hold). Reduce heat to simmer and stir until liquid is absorbed. Continue adding hot water one ladle at a time, simmering until liquid is absorbed before each addition and stirring frequently, until rice is just tender and mixture is very thick, about 25 minutes. *Tip - the more you stir, the creamier your risotto will be.
5. Add in cheese, parsley, and garlic puree into risotto. Season to taste with salt and freshly ground black pepper. Remember that the Parmesan cheese is salty, so be sure to taste before you add salt. Top with additional Parmesan cheese and parsley and dig in!

I hope you enjoy this dish as much as Mike and I did :). Bon appetit! 

Monday, July 25, 2011

Chicken Adobo

Good enough to be called the Philippines' national dish!


Image from myrecipes.com

I've got a lot of Filipino love :)  Lots of Filipino friends, involvement in the Pilipino Student Association (by proxy - my roommate was the president), one of my favorite mentors is a Filipina physician, and of course, Mikey is Filipino.  Not only do I love Filipinos, I love Filipino food.  First time I had a bite, was love at first taste.  It was home cooking at its finest - not very complex, but so good you have to come back for seconds and thirds. 

A few days ago, Mike and I decided that we needed some comfort food so Mike cooked chicken adobo for me.  Adobo refers to a method of cooking where meat is browned and simmered in a marinade.  There are many different ways to prepare adobo and it is different depending on where you are in the Philippines. Some places add coconut milk, some use pork or seafood, and some use a lot of vinegar. Classically though, adobo is slowly cooked in vinegar, crushed garlic, bay leaf, black peppercorns, and soy sauce then often browned in the oven or pan-fried afterward to get the desirable crisped edges.  Here's Mike's take on chicken adobo: 
Chicken Adobo
Serves 4 
Print this recipe

Ingredients
1 tablespoon vegetable oil
3 lbs chicken thighs and drumsticks
5 cloves garlic, peeled and smashed
1/3 cup white vinegar (or you can use apple cider vinegar)
2/3 cup soy sauce
1 teaspoon whole black peppercorns
2 bay leaves


Directions
1. Heat oil in a medium dutch oven or similar pot over medium-high heat. Add chicken and cook until lightly browned, about 5 minutes, then turn over and cook an additional 5 minutes.
2. Add garlic and cook for approximately 5 more minutes. Stir to avoid burning the garlic.  Spread chicken so it makes one even layer in the bottom of the dutch oven. Add remaining ingredients and stir to incorporate. The sauce should come halfway up the chicken Cook on medium heat, covered, for 20 minutes.  Gently stir every 5-10 minutes to ensure that all of the chicken has some time to cook in the sauce.
3. Uncover, decrease heat to medium-low and cook 15 to 20 minutes more, occasionally spooning sauce over chicken, until sauce thickens a bit and chicken is tender and nicely glazed with sauce. Remove bay leaf before eating.
4. Serve with rice.  My favorite part of the adobo is the sauce.  Spoon it over your rice and you're set :)

Since Mike is is not one to write down recipes or take pictures, the images and the recipe are from myrecipes.com. I modified the recipe a bit.

Hopefully I will learn how to make some other Filipino dishes so I can share them with you!

Bon appetit!


Sunday, July 24, 2011

Roasted Garlic

My favorite condiment


Short, but very delicious post today!  I am working on my residency application and it is taking a lot of time.  I want to be an ophthalmologist and it turns out that it is a competitive field to get into!  I haven't had a lot of time to cook this month because of my application, but I did have the time to make some roasted garlic the other night.  It is one of my favorite condiments.  Yes, I consider it a condiment because you can use it in about a hundred different ways - put it on bread, stir it into mashed potatoes, use it to flavor hummus, have it as a side dish, and some people even eat it straight!  Even people who do not like garlic should try this.  After roasting the garlic, it becomes soft, sweet, and buttery.  It doesn't have the sharp taste of raw garlic at all. This is one of my favorite foods to make as well, because it requires very little effort.  Just cut the top off of the head of garlic, drizzle with olive oil, and pop it into the oven.  Once it is done, my favorite thing to do is to squeeze the cloves out of the skins.  It's so fun!  Mike and I ended up taking the roasted garlic and mixed it into risotto and it was divine.  More about the risotto in a later post :).  Here are more detailed instructions:


Roasted Garlic
Print this recipe


Ingredients
Whole heads of garlic
1 TBSP olive oil for each head of garlic


Directions
1. Preheat oven to 400 degrees F. 
2. Peel away most of the paper off of each head of garlic, and cut 1/4 - 1/2 inch off each head, exposing the cloves.
3. Take a large rectangle of aluminum foil and fold it in half to make a square.  Place one head in the middle of the aluminum foil and drizzle with olive oil.  Bring the corners of the aluminum foil together to  securely wrap each head.  Repeat for remaining garlic.
4. Roast for approximately 40-45 minutes, or until cloves are soft and a deep golden brown.  I like to roast mine in a cupcake pan to ensure that the garlic stays upright and no oil leaks out.
5. Allow garlic to cool for 10-15 minutes, then cloves can be easily squeezed out of their skins.
6. Enjoy spread on a crusty baguette, stirred into mashed potatoes, or any way you wish!


As a side note, I am trying to learn how to take food pictures, but I don't really know how to edit them or make them look beautiful.  If anyone can offer any advice, please do!  The food tastes so good and I want the pictures to illustrate that :)


Bon appetit!

Wednesday, July 20, 2011

Ohio Deli

Greasy Spoon

photo from singledigitdining.com


Mike and I really love to watch food TV.  I like to watch the Cooking Channel and the Food Network and Mike watches the Travel Channel.  Well, one day Mike saw an episode of Man vs. Food in Columbus and he said that he wanted to try all of those places.  If you guys haven't seen Man vs. Food, this guy (Adam Richman) travels across the nation to look for "food challenges" - the spiciest, the most outrageous, the biggest, etc.  Usually it's these enormous meals, and that was the case for the Columbus episode.  He went to Schmidt's and had a huge cream puff, Thurman's for a giant burger, and Ohio Deli for an enormous Dagwood sandwich.  We have already been to Schmidt's and Thurman's, so it was only natural for Mike to want to try Ohio Deli.

We drove 20 minutes or so to the southside of Columbus.  For those of you who haven't been there, it's not in the best part of town.  There was a trailer park across the street and it was a little sketchy, but we figured if this place was on TV, it had to be good.. right?  We would soon find out!  It turned out that Ohio Deli was more then just a Deli - more of a diner.  They had food like steak, sandwiches, fish and chips, fried chicken, etc.  As soon as we walked in, we saw a server carry one of their famous Dagwood sandwiches to someone's table.  It was HUGE.  At least 6 inches of cold cuts, a huge pile of fries, and a pickle.  We decided that it would be a little too much food for us and opted to get two smaller sandwiches.  Mike got a turkey club on a croissant and I got a monte cristo.  We also split an order of cheese fries.  The food was ok, but nothing to write home about.  My ham was really, really salty, and the food was quite greasy.  However, the price was very reasonable, and the portions were large (see picture above).  We spent less than $20, including drinks.  Overall, we decided that we wouldn't go back just because it was so far away from campus. 

So that was our adventure to Ohio Deli!  


As a side note, we don't think that we will go out of our way anymore to go to any of Adam Richman's recommendations.  Earlier this month, we went to a restaurant called Primanti Brother's in Pittsburgh.  We heard tons of good things about it on the show, but when we actually got there, the service was horrible and the food was even worse.  I think that most of the food that Adam Richman eats on his show is just massive, and not necessarily delicious.  I mean, how can you enjoy a dish if you are shoveling it down your mouth as fast as you can?  Anyways, that's my rant for the day.  I still like ya, Adam :)


Friday, July 15, 2011

Spaghetti and Meatballs

Home Cookin'


Mike, my boyfriend, is also a fourth year med student.  He wants to do urology and he’s doing his sub-internship this month.  It is super hard on him because he works for at least 12 hours a day and he still has to study when he comes home.  A few days ago, he worked for 19 hours!  So, being the good girlfriend that I am ;), I decided to cook for him this week.  Earlier this week I made maple-pecan pork chops, mashed sweet potatoes, and roasted broccoli.  Unfortunately, I didn’t take any pictures, so next time I make that meal, I will be sure to post!  Last night, I made spaghetti with meat sauce and meatballs.  Nice, comforting, home food.  I don’t have a lot of time to make my own marinara sauce, so I took a little help from the store and used a jarred sauce. But I added some meat, herbs, and spices so it wouldn’t taste like it came from a jar.  I usually make my sauce with ground turkey, but Mike can always tell, so last night I made it with beef.  The meatballs can be made with turkey as well, but they won’t be as moist as beef meatballs. It's really good and you can't even tell that jarred sauce was used after you add the meat, herbs and spices.  I hope you enjoy!


Meat sauce

Ingredients
1 jar (24 oz) spaghetti sauce
2 cloves of garlic, finely chopped
½ medium onion, diced
1 tbsp extra virgin olive oil
2 tsp sugar
½ lb ground beef (or turkey)
½ tsp onion powder
½ tsp garlic powder
½ tsp kosher salt
¼ tsp freshly ground black pepper
1 tbsp basil, chopped

Directions
1. On medium heat, heat onions and garlic in olive oil until onion begins to become transparent, about 5-7 minutes.
2. Turn heat to medium high. Add ground beef (or turkey) and break up well. When meat is broken up, add 1 tsp of sugar, garlic powder, onion powder, salt, and pepper.  Taste and adjust seasonings when meat is fully cooked
3. Add jar of sauce and turn down to medium.  Add 1 tsp of sugar and any additional salt and pepper to taste.
4. Simmer for 20 minutes. Add basil. Enjoy!


Meatballs
Serves 8 (I halved the recipe)
Print this recipe

Ingredients
¾ lb ground beef
¼ lb ground sausage
1 clove garlic, minced
½ tsp salt
1 egg
scant ½ Italian breadcrumbs

Directions
1. Preheat oven to 375.
2. Combine all ingredients (be careful not to overmix!) and form into 1.5 inch balls.
3. Bake for approximately 15 minutes until meatballs are firm. 
4. Toss into sauce if desired.

I just served this with 1/2 lb of spaghetti noodles and I will have enough leftovers for dinner tomorrow!  The sauce is versatile and can be used for baked ziti, lasagna, or any other pasta. This recipe can be pretty healthy too!  Just make it with turkey and serve on whole wheat pasta. Yum!


Thursday, July 14, 2011

Chocolate cupcakes with peanut butter buttercream

Random acts of kindness


Welcome to my blog!  I have been planning on making a food blog for years, but I just haven't had time during med school.  Now that I am a fourth year student, I finally have some time!  Whee!  Here's a little bit of information on me: My name is Nhu-Y and I am from Ohio.  I am first generation Vietnamese and I grew up eating Vietnamese food.  I grew up in a smallish suburb, so there wasn't much variety in food (pizza, Applebees, American Chinese, fast food, etc).  When I got to college, my love for food began.  I got to try many different foods from different countries and cultures.  And when I got my first apartment, I could finally cook!  I love to try new cuisines and I love to try cooking different foods.  I don't have much time though, being a med student, so I will write about anything I cook whether it is fast and simple or ornate and complicated!


My first entry is for chocolate cupcakes with a peanut butter buttercream.  Here's why I made them: The latch on my trunk broke, and of course, it broke right before a thunderstorm.  The next day, I was outside tinkering with the latch when a total stranger pulled up and said that my trunk was open during the thunderstorm and he tried to close it for me.  Then, he fixed my trunk for me!  It was so kind of him, and it turns out that he is my downstairs neighbor, so I decided to make him some cupcakes as a token of my appreciation.  


Chocolate cupcakes (courtesy of Martha Stewart - my fav! )
Makes 12 cupcakes
Print this recipe


Ingredients

  • 3/4 cup unsweetened cocoa powder
    3/4 cup all-purpose flour
    1/2 teaspoon baking powder
    1/4 teaspoon salt
    3/4 cup (1 1/2 sticks) unsalted butter, room temperature
    1 cup sugar
    3 large eggs
    1 teaspoon vanilla extract
    1/2 cup sour cream
    6 peanut butter cups, halved

    Directions
    1. Preheat oven to 350 degrees. Line 12-cup standard muffin tin with paper liners.

    2. Into a medium bowl, sift together cocoa, flour, baking powder, and salt; set aside. In a mixing bowl, cream butter and sugar until light and fluffy. Add eggs, one at a time, beating well after each, then beat in vanilla. With mixer on low speed, add flour mixture in two batches, alternating with sour cream and beginning and ending with flour.

    3. Pour batter into cups, filling each 3/4 full. Bake until a toothpick inserted in centers comes out clean, 20 to 25 minutes.

    4. Cool in pan 5 minutes; transfer to a wire rack to cool completely.  Then pipe with frosting and top with half of a peanut butter cup.


    Peanut butter buttercream (courtesy of Food.com)
    Makes enough for 12 cupcakes
    Ingredients
    8 tablespoons unsalted butter, softened
    1/2 cup smooth peanut butter, don't use old-fashioned or natural brand
    3/4 cup confectioners' sugar
    1 pinch table salt
    1/2 teaspoon vanilla extract
    1 tablespoon heavy cream

    Directions:
    1. In standing mixer fitted with whisk attachment, beat butter and peanut butter at medium-high speed until smooth, about 20 seconds.

    2. Add confectioners' sugar and salt; beat at medium-low speed until most of the sugar is moistened, about 45 seconds.

    3. Scrape down bowl and beat at medium speed until mixture is fully combined, about 15 seconds; scrape bowl, add vanilla and heavy cream, and beat at medium speed until incorporated, about 10 seconds, then increase speed to medium-high and beat until light and fluffy, about 4 minutes, scraping down bowl once or twice.

    The final cupcake is moist and chocolatety, and the buttercream is not too sweet.  Make sure you beat it frosting for long enough so it is nice and fluffy.  Otherwise, it will deflate right after you pipe the frosting.  So yummy!!  

    That's it for today, but I will be back soon!